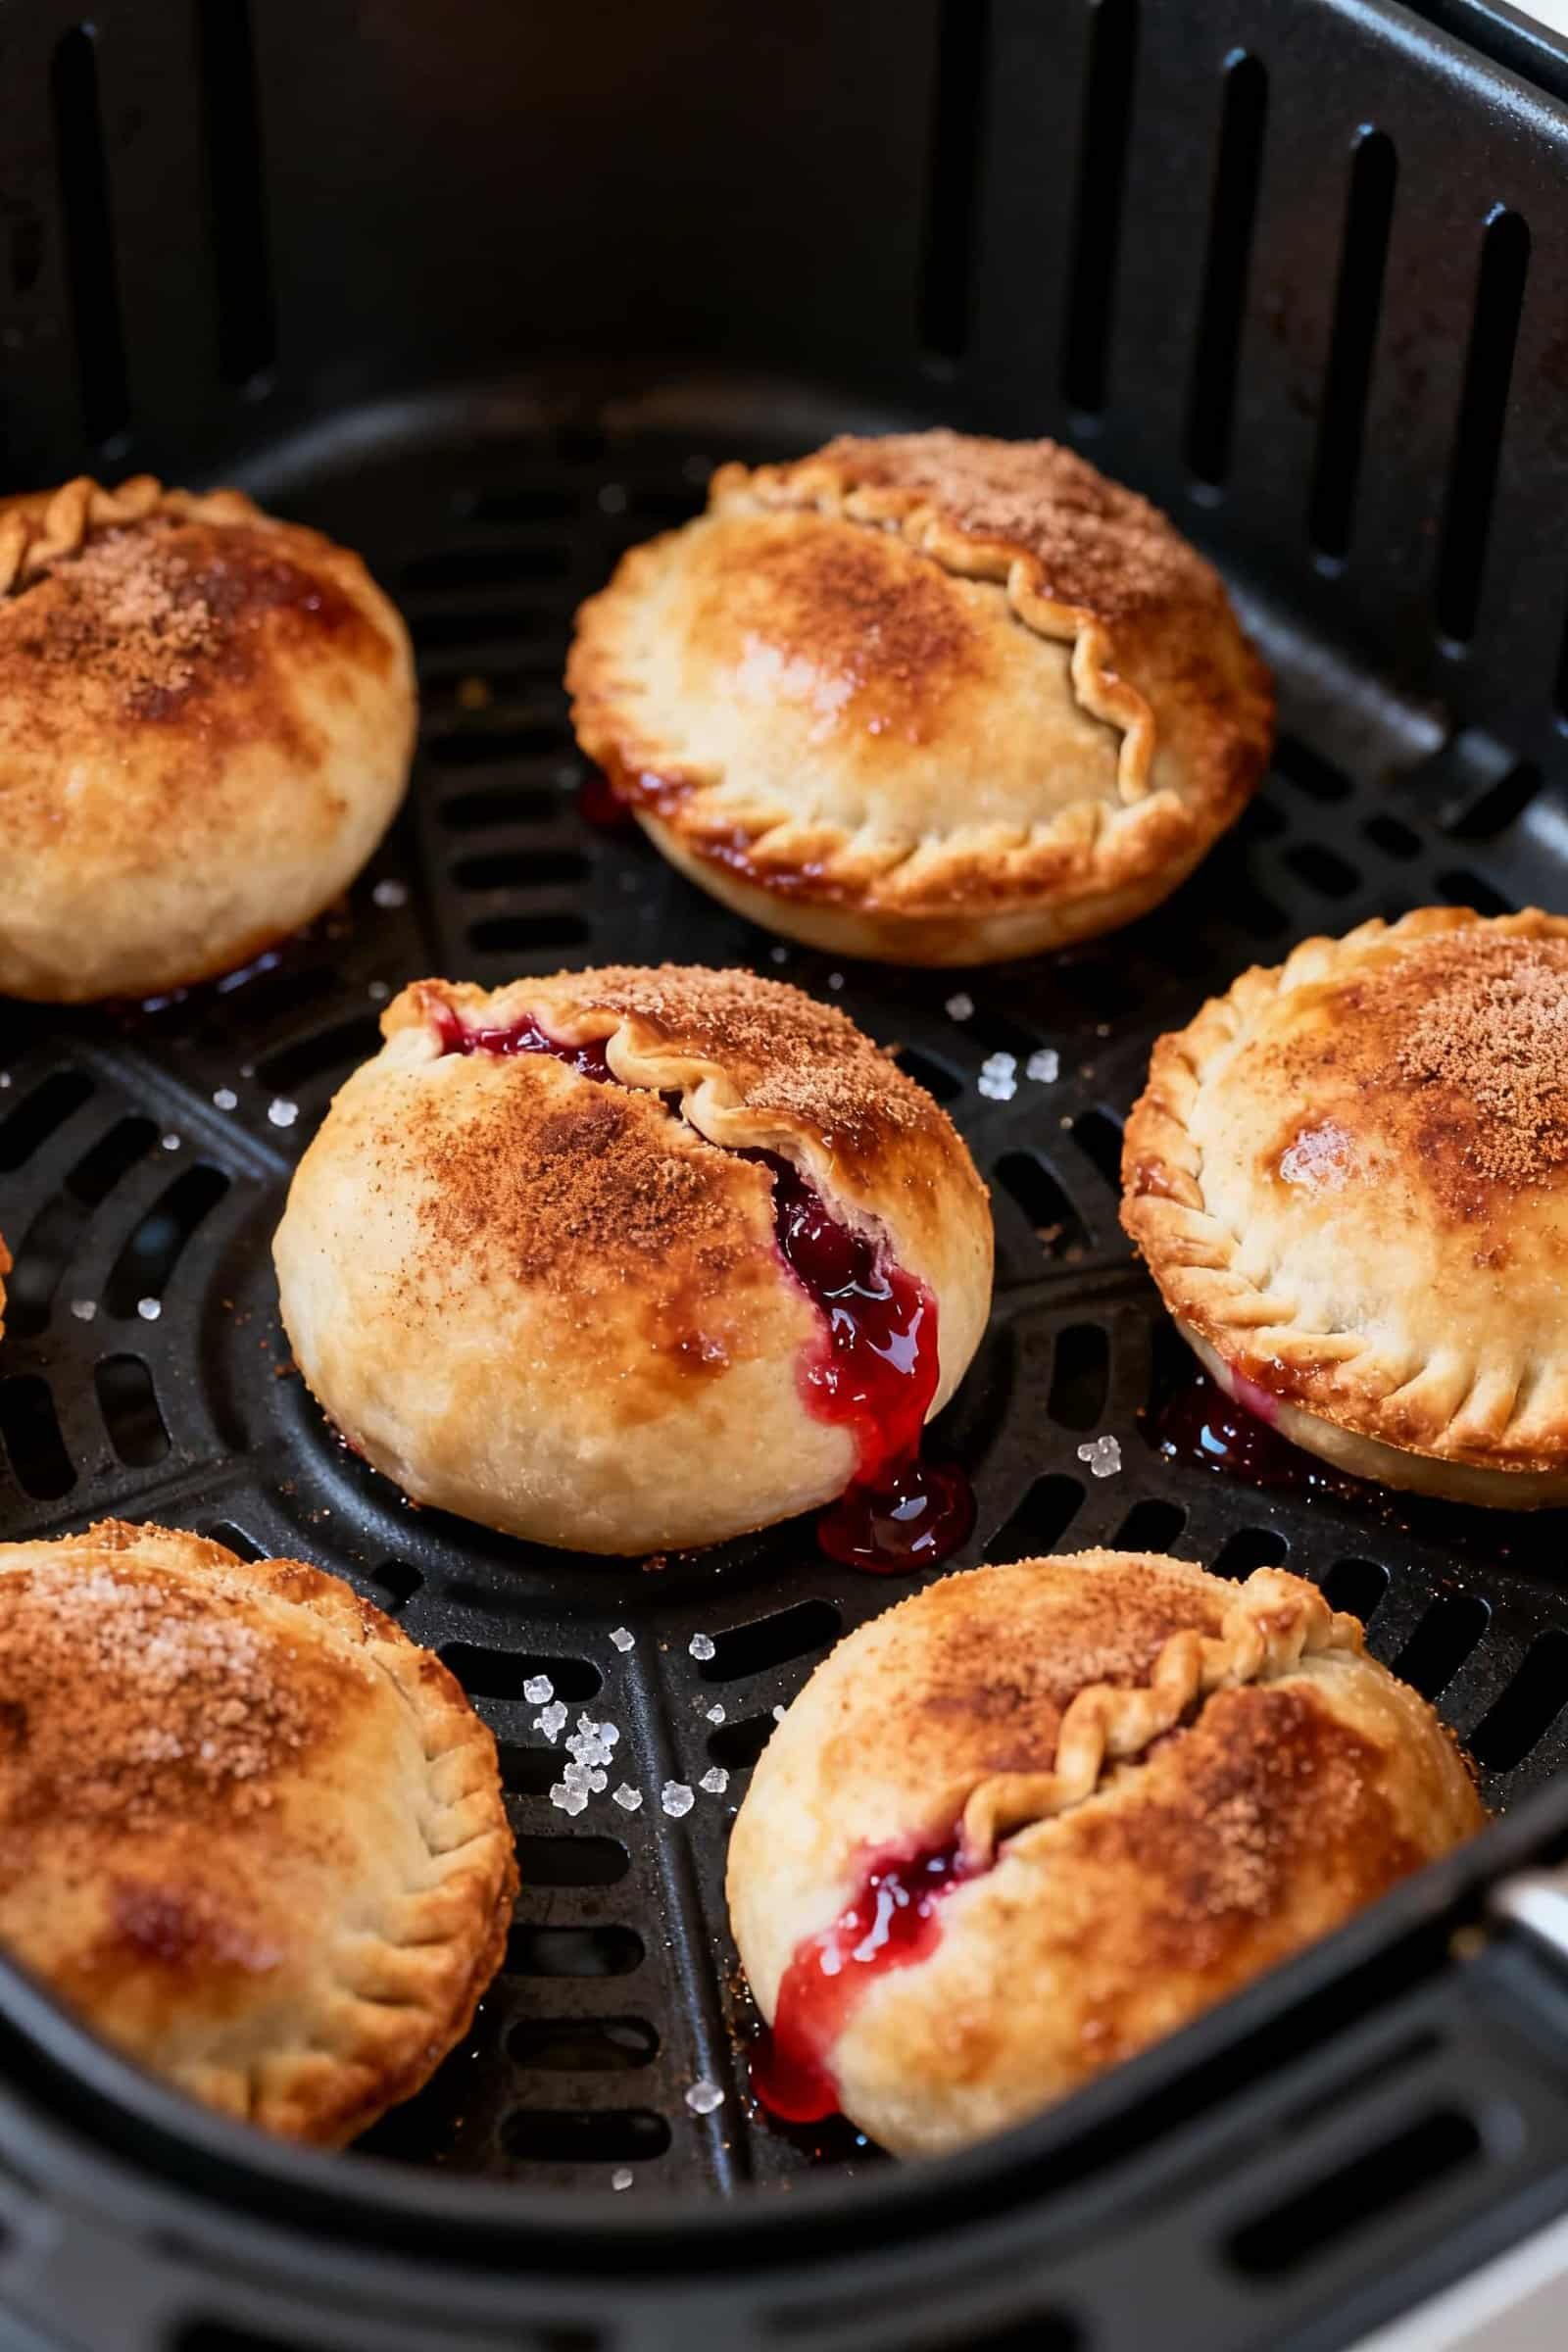
Warm, flaky, and bursting with sweet cherry filling, these Air Fryer Cherry Pie Bombs feel like a little bakery treat made right at home. They come together quickly with store-bought dough and a few pantry staples, so you don’t have to fuss with pie crusts. The air fryer gives them a golden, crisp outside while keeping the centers gooey and bright.
Whether you’re making a quick dessert for guests or a fun weekend snack, these bite-sized pies are a hit. And the best part? You can prep them in minutes and enjoy them warm right away.
What Makes This Special
These cherry pie bombs offer classic pie flavor without the work of a full pie.
Using canned cherry pie filling keeps the fruit perfectly juicy, and pre-made dough means no rolling pins or chilling times. The air fryer cooks them fast and evenly, so you get that crisp, caramelized surface you usually only see in a bakery. They’re easy to customize, great for portion control, and perfect for sharing.
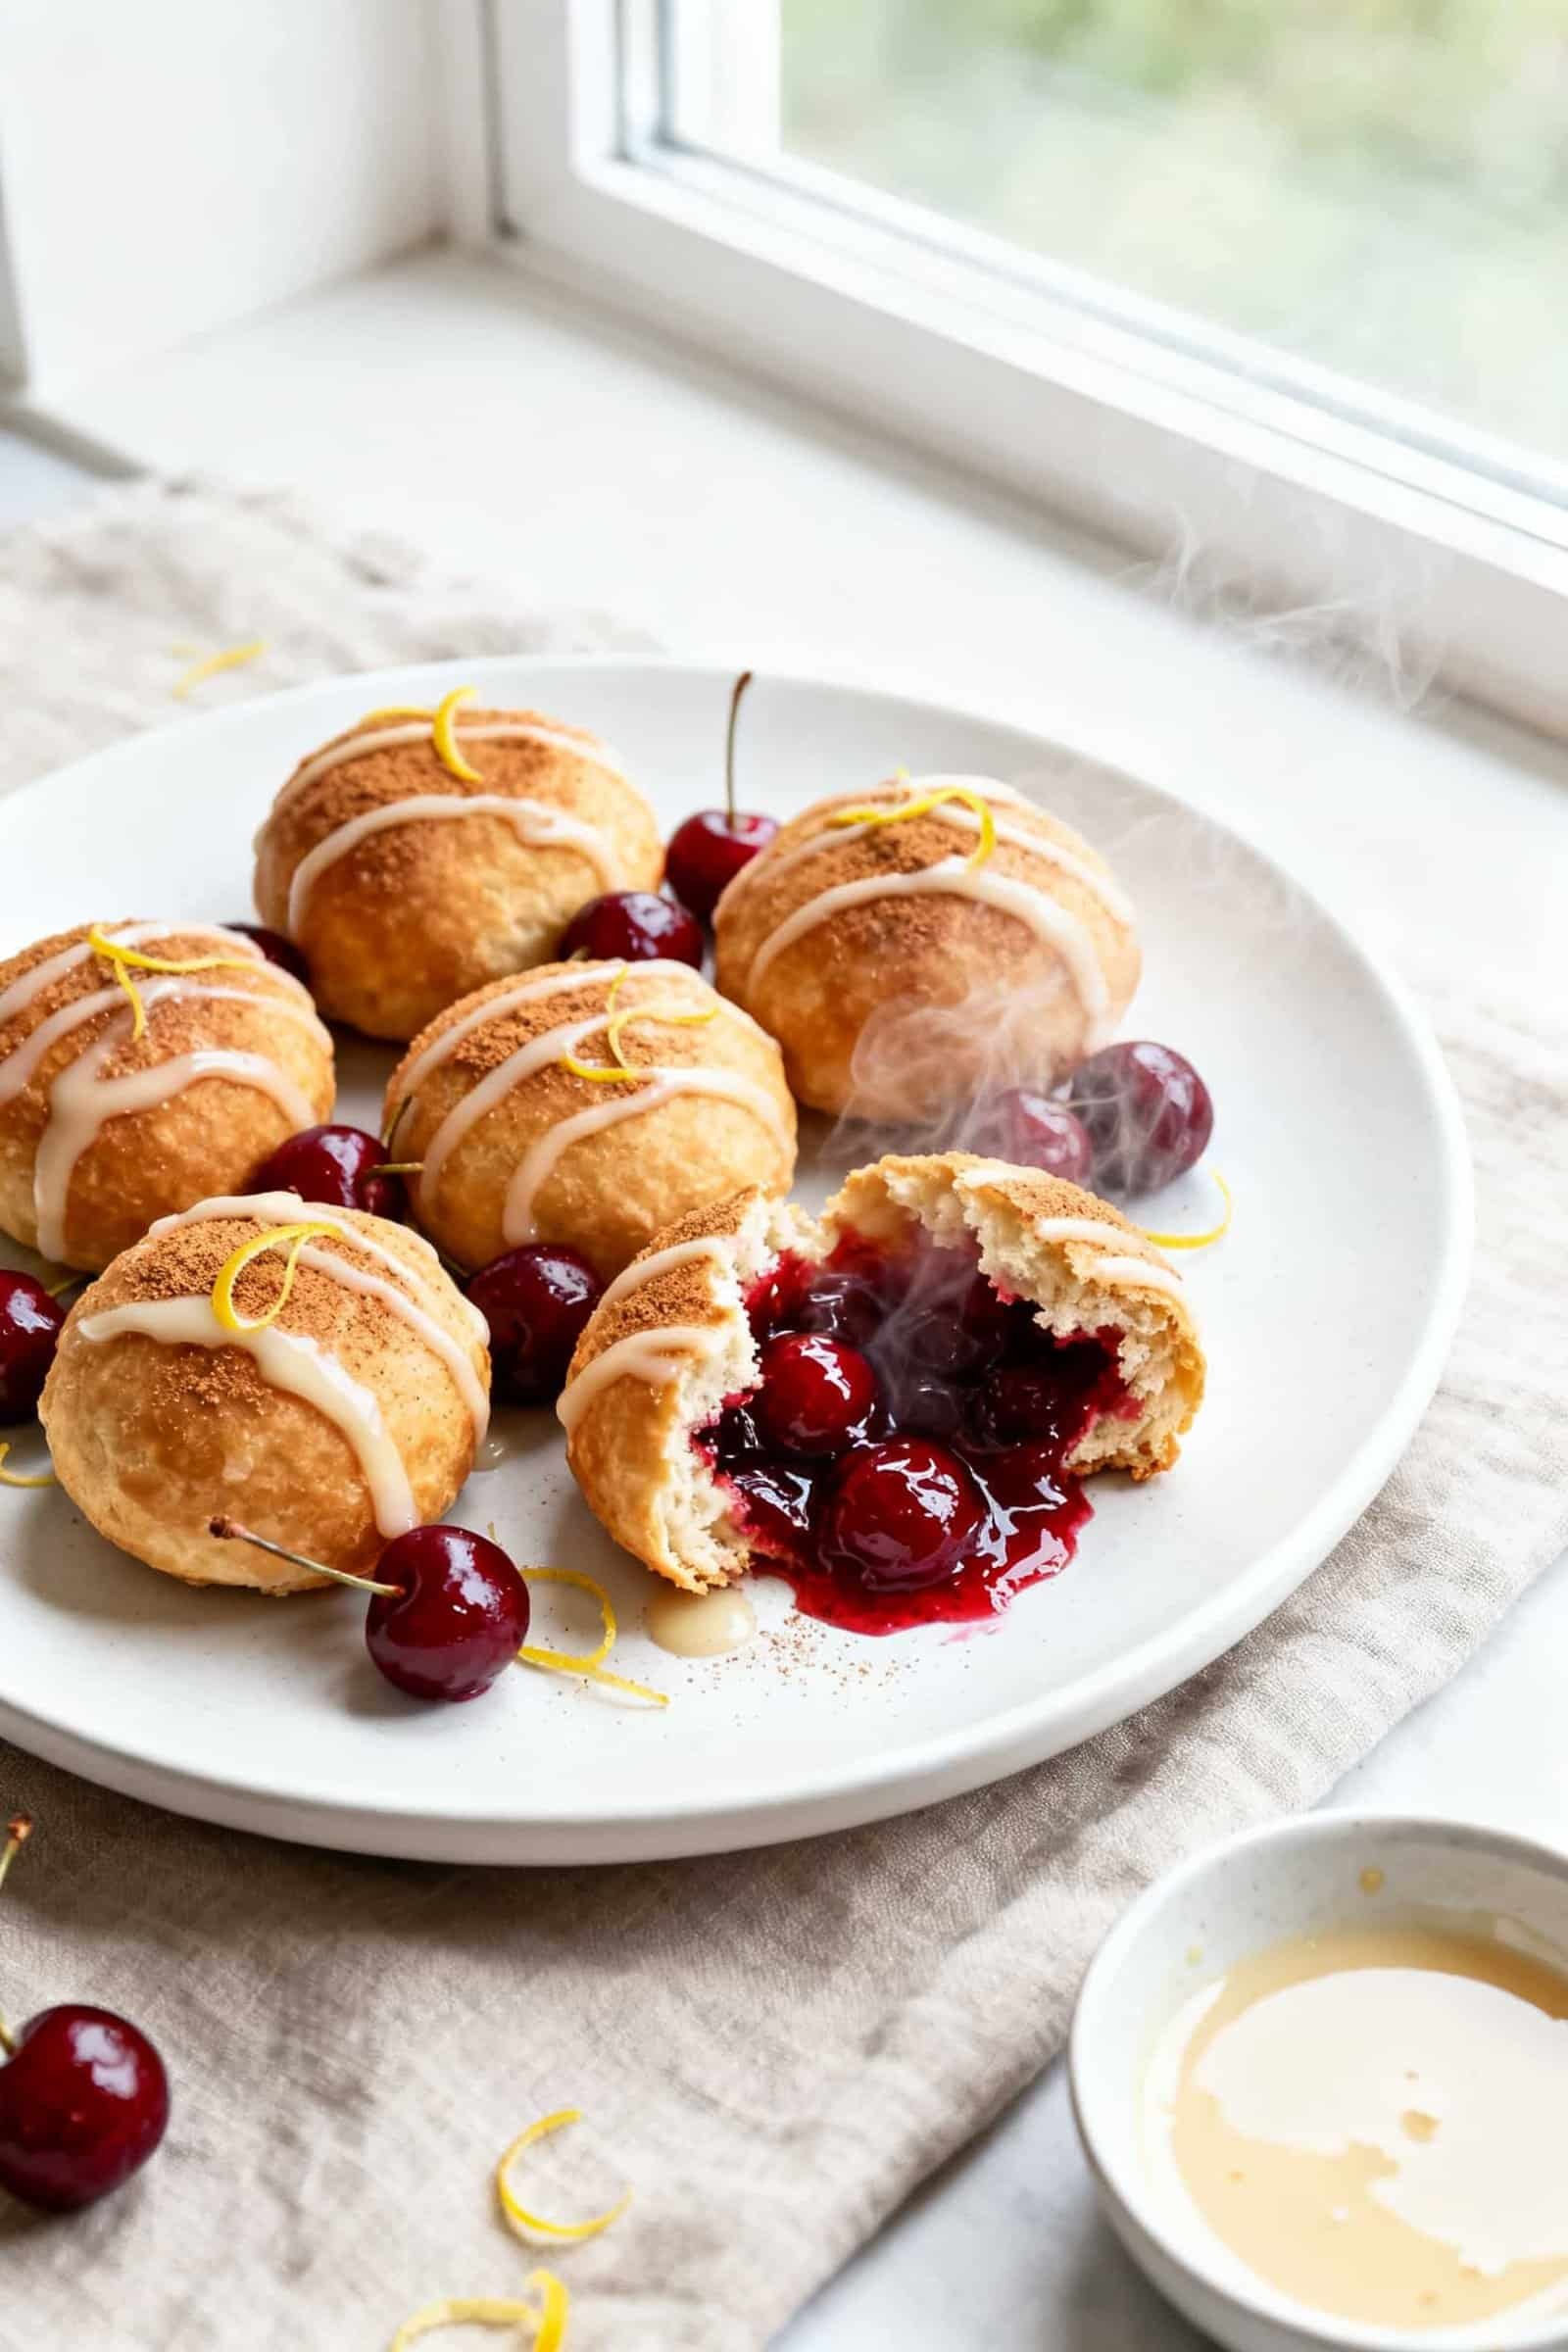
Plus, they taste amazing warm, dusted with cinnamon sugar or drizzled with a simple glaze.
Air Fryer Cherry Pie Bombs – A Fast, Fun Dessert With Big Flavor
Ingredients
- Refrigerated biscuit dough (1 can, 8-count; flaky or buttermilk style)
- Canned cherry pie filling (about 1 cup; you won’t need the whole can)
- Granulated sugar (for coating)
- Cinnamon (ground, for coating)
- Unsalted butter (2–3 tablespoons, melted)
- Vanilla extract (optional, for glaze)
- Powdered sugar (optional, for glaze)
- Milk or cream (optional, for glaze)
- Nonstick spray or a little neutral oil (for the air fryer basket)
Instructions
- Prep your air fryer. Preheat to 350°F (175°C) for 3–5 minutes. Lightly mist the basket with nonstick spray or brush with oil to prevent sticking.
- Mix the coating. In a small bowl, combine 1/3 cup granulated sugar with 1 teaspoon cinnamon. In a separate bowl, melt 2–3 tablespoons of butter.
- Separate the dough. Open the biscuit can and gently separate the 8 pieces.Press each biscuit into a 3–4 inch round. Keep the edges a bit thicker than the center to help prevent leaks.
- Add the filling. Spoon about 1 heaping tablespoon of cherry pie filling into the center of each round. Try to include cherries with minimal extra syrup to avoid overflow.
- Seal the bombs. Pull the dough edges up over the filling and pinch tightly to seal.Roll gently between your hands to form a smooth ball, keeping the seam well closed. A tight seal is key to prevent bursting.
- Butter and coat. Brush or roll each ball in melted butter. Then roll in the cinnamon sugar until fully coated.
- Arrange in the basket. Place the pie bombs seam-side down in the air fryer basket, leaving a little space between each. Don’t overcrowd; cook in batches if needed.
- Air fry. Cook at 350°F (175°C) for 7–10 minutes, or until golden brown and crisp. Start checking at 7 minutes; different air fryers vary.If a seam opens, let it finish cooking—slight leakage is okay.
- Optional glaze. While they cook, whisk 1/2 cup powdered sugar with 1–2 teaspoons milk and a drop of vanilla until smooth. Adjust to your preferred thickness.
- Finish and serve. Let the pie bombs rest for 3–5 minutes—they’ll be very hot inside. Drizzle with glaze or dust with extra cinnamon sugar.Serve warm.
Storage Instructions
- Room temperature: Keep leftovers in an airtight container for up to 1 day. The sugar coating may soften slightly.
- Refrigerator: Store in an airtight container for 3–4 days. Reheat in the air fryer at 325°F (165°C) for 3–5 minutes to crisp up.
- Freezer: Wrap individually and freeze for up to 2 months.
Reheat from frozen in the air fryer at 320°F (160°C) for 6–9 minutes, or thaw in the fridge first and warm for 3–4 minutes.
- Glaze tip: If using glaze, add it after reheating so it doesn’t get tacky in storage.
Benefits of This Recipe
- Fast and fuss-free: Minimal prep and no rolling pins or special equipment.
- Great texture: The air fryer gives a crisp exterior and soft, gooey center.
- Portion-friendly: Individual treats are easy to serve and share.
- Customizable: Swap fillings or coatings to match the season or your taste.
- Kid-approved: Fun to make together and easy for little hands to hold.
What Not to Do
- Don’t overfill. Too much cherry filling makes sealing difficult and increases leaks.
- Don’t skip the seal. If the seam isn’t pinched tight, the filling will escape and burn.
- Don’t overcrowd the basket. Crowding prevents airflow and leads to pale, underdone spots.
- Don’t crank up the heat too high. Higher temps can brown the outside while the dough inside stays raw.
- Don’t move them too soon. Let them sit a few minutes after cooking; the filling is molten.
Alternatives
- Dough swaps: Use crescent roll dough triangles (pinch seams together) or thawed puff pastry squares. Adjust cook time by a minute or two as needed.
- Different fillings: Try apple, blueberry, or peach pie filling. For a richer twist, add a small square of cream cheese with the cherries.
- Coating options: Skip cinnamon and use plain sugar, or try a cardamom-sugar blend.
A vanilla or almond glaze is lovely with cherry.
- From-scratch dough: If you prefer, use homemade biscuit or sweet roll dough. Keep portions small and the seal tight.
- Add-ins: A few chocolate chips with cherry make a Black Forest vibe. Or sprinkle sliced almonds on the glaze.
FAQ
Can I make these ahead?
Yes.
Assemble and refrigerate the sealed, uncoated bombs for up to 12 hours. When ready to cook, brush with butter, roll in sugar, and air fry. Add 1–2 extra minutes if they’re still cold.
Why did my pie bombs leak?
Most leaks come from overfilling or a weak seam.
Use about 1 tablespoon of filling and make sure the edges are pinched firmly, with the seam placed on the bottom in the basket. Also avoid very runny filling; pick cherries with less syrup.
Can I bake them in the oven instead?
Absolutely. Bake on a lined sheet at 375°F (190°C) for 12–16 minutes, until golden.
The oven needs a bit more time than the air fryer to achieve the same color and crispness.
What size air fryer works best?
Any size works as long as you leave space between the bombs. A larger basket holds more at once, but a smaller model just means cooking in batches. The key is airflow for even browning.
How do I know they’re done?
Look for a deep golden color and a firm, crisp exterior.
If you’re unsure, remove one and check the bottom—if it’s pale and soft, give them another 1–2 minutes.
Can I reduce the sugar?
Yes. Skip the cinnamon sugar coating and just brush with butter before air frying. You can also use a light dusting after cooking or stick with a thin glaze to control sweetness.
What if I don’t have cherry pie filling?
Use any thick fruit spread or jam and add a few fresh or frozen berries.
Avoid very loose fillings, which are harder to seal and more likely to leak.
Do they reheat well?
They reheat nicely in the air fryer. A few minutes at 325°F (165°C) brings back the crisp exterior without drying them out. The microwave softens the crust, so use it only in a pinch.
Can I make them gluten-free or dairy-free?
Yes.
Choose a gluten-free biscuit dough or puff pastry alternative and check the pie filling label. For dairy-free, use plant-based butter or skip the butter and mist with oil before the sugar coating.
How many does this recipe make?
Using one standard can of biscuits yields 8 pie bombs. You can easily double the recipe—just cook in batches so they brown evenly.
Wrapping Up
Air Fryer Cherry Pie Bombs bring big pie flavor in a fast, hand-held package.
With simple ingredients and minimal prep, you can whip up a warm, bakery-style treat anytime. Keep a can of biscuit dough and cherry filling on hand, and you’re only minutes away from a cozy, shareable dessert. Once you master the seal and timing, you can swap fillings and make them your own.
Quick, fun, and satisfying—this is a sweet win for any day of the week.